> ## Documentation Index
> Fetch the complete documentation index at: https://docs.cowagent.ai/llms.txt
> Use this file to discover all available pages before exploring further.
# WeCom Bot
> Connect CowAgent to WeCom AI Bot (WebSocket long connection)
> Connect CowAgent via WeCom AI Bot, supporting both internal direct messages and group chats. No public IP required — uses a WebSocket long connection, with Markdown rendering and streaming output.
WeCom Bot and WeCom App are two different integration methods. WeCom Bot uses a WebSocket long connection and requires no public IP or domain, making setup much simpler.
## 1. Connection methods
### Option A: One-click QR scan (recommended)
No need to create the bot ahead of time. Start CowAgent and open the Web console (local URL: [http://127.0.0.1:9899/](http://127.0.0.1:9899/)), go to the **Channels** tab, click **Connect Channel**, choose **WeCom Bot**, switch to **QR scan** mode, and scan the QR code with **WeCom** — bot creation and connection complete automatically.
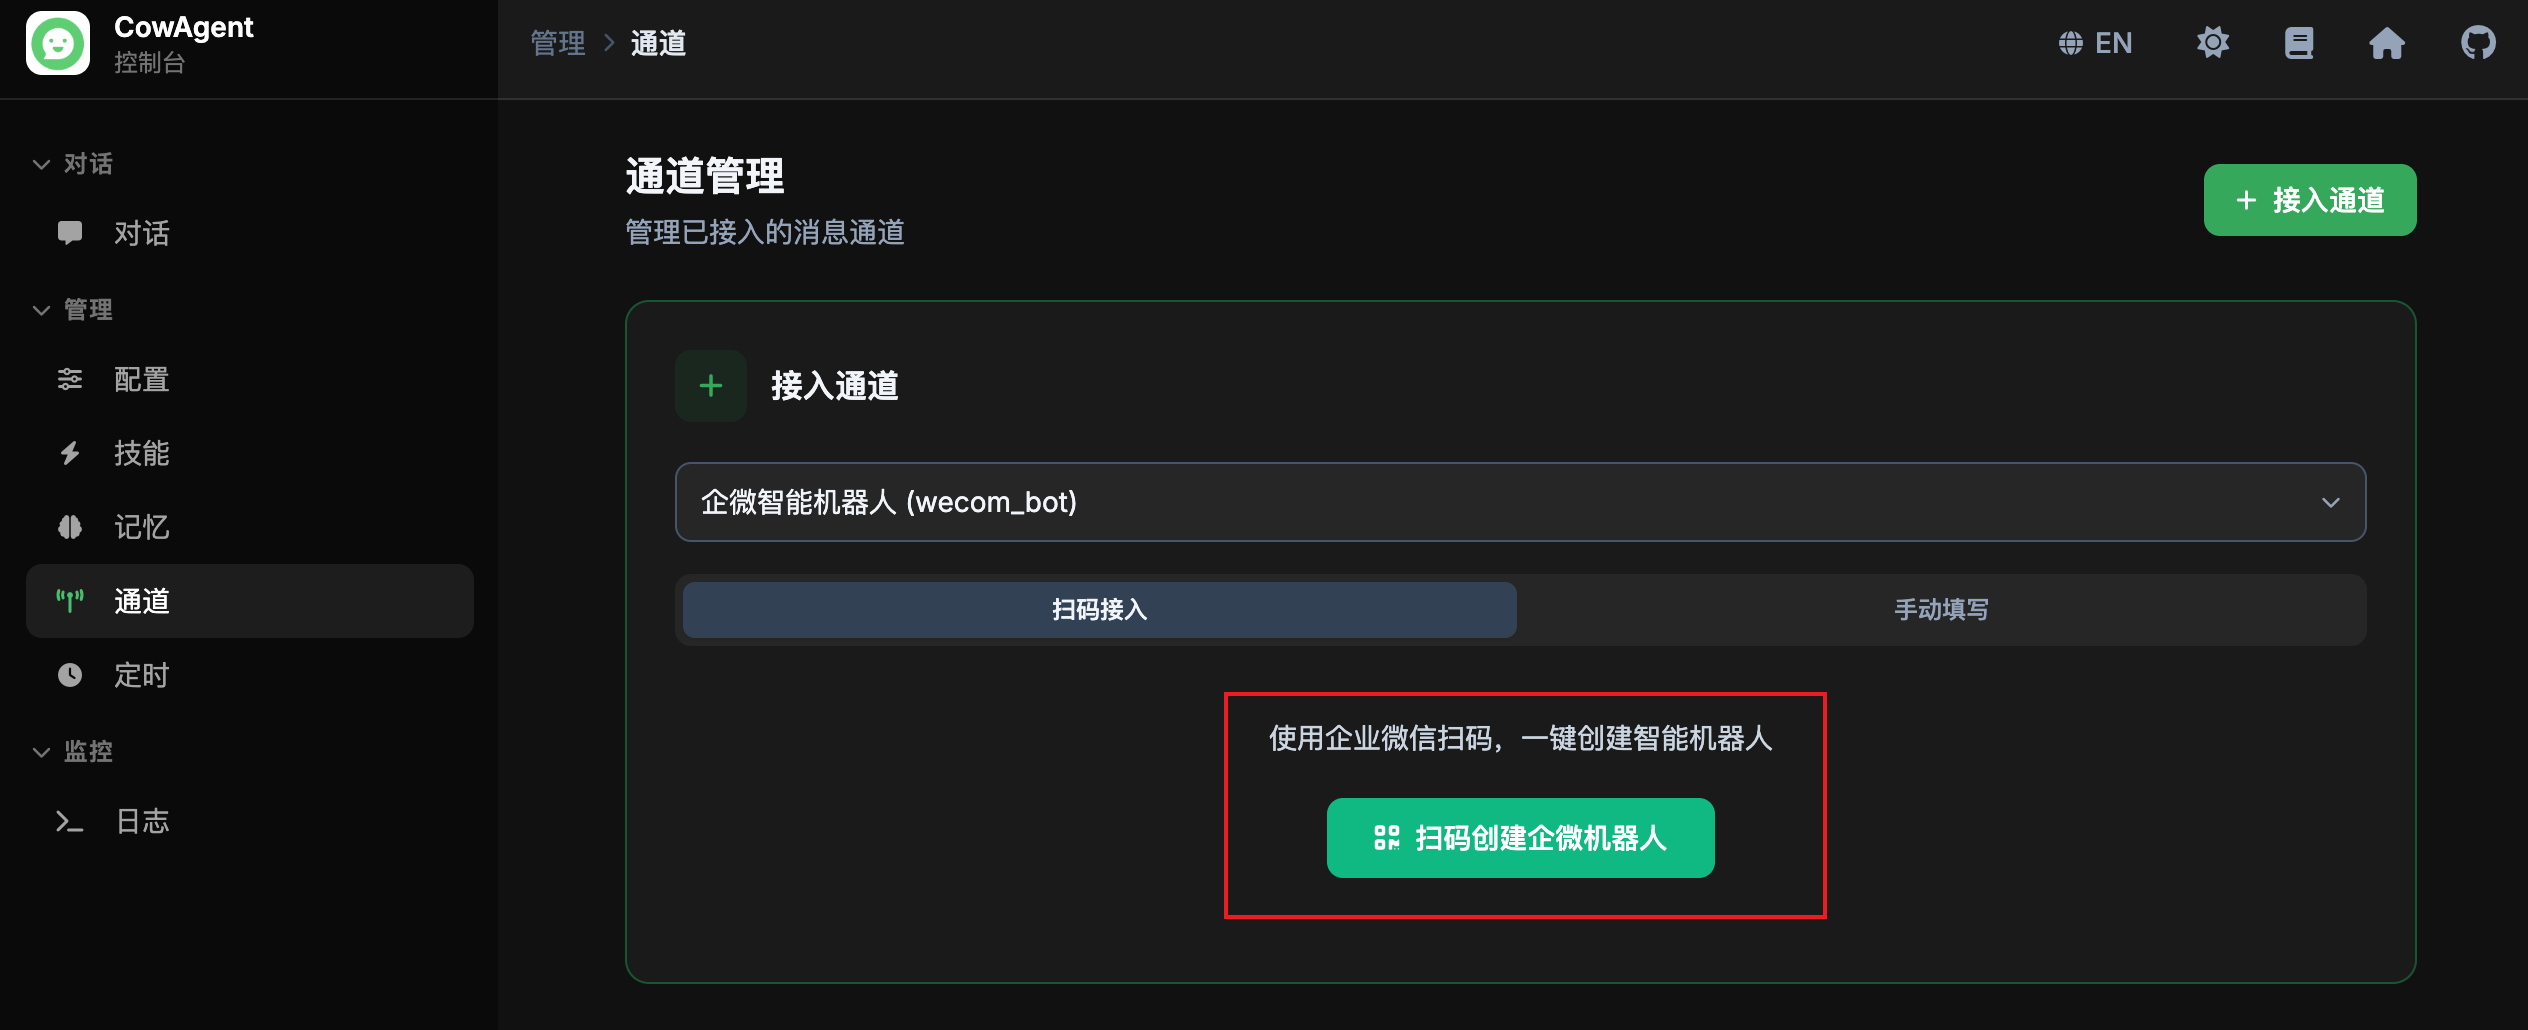 After a successful scan, you can further configure the bot (name, avatar, visibility scope, etc.) in **WeCom Workbench → AI Bot**.
### Option B: Manual creation
Create the AI Bot in WeCom and obtain the Bot ID and Secret, then connect via the Web console or config file.
**Step 1: Create the AI Bot**
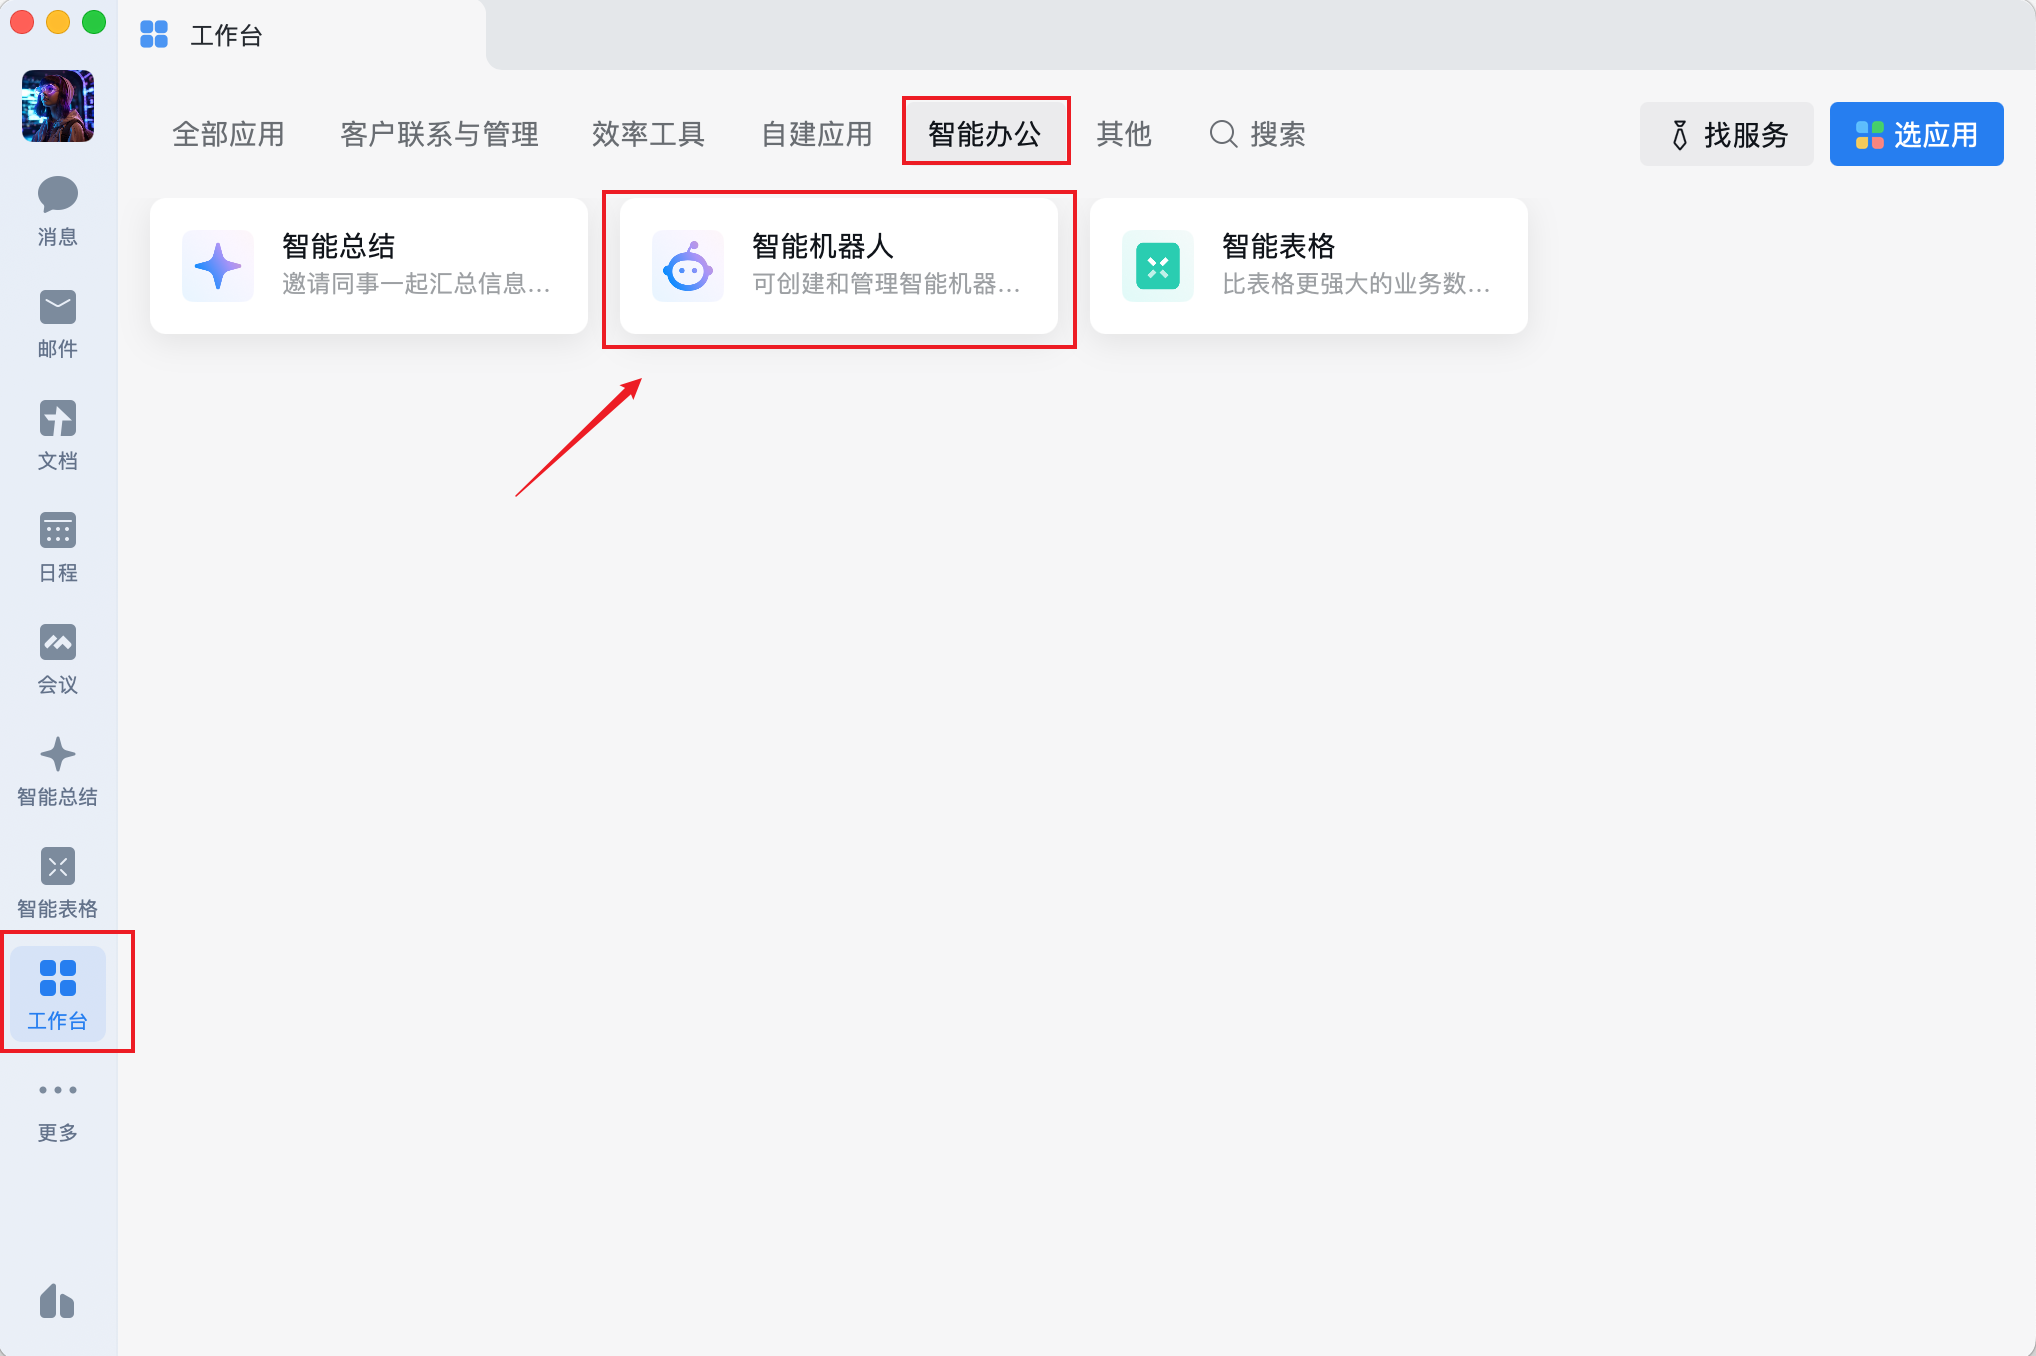
1. Open the WeCom client, go to **Workbench**, and click **AI Bot**:
After a successful scan, you can further configure the bot (name, avatar, visibility scope, etc.) in **WeCom Workbench → AI Bot**.
### Option B: Manual creation
Create the AI Bot in WeCom and obtain the Bot ID and Secret, then connect via the Web console or config file.
**Step 1: Create the AI Bot**
1. Open the WeCom client, go to **Workbench**, and click **AI Bot**:
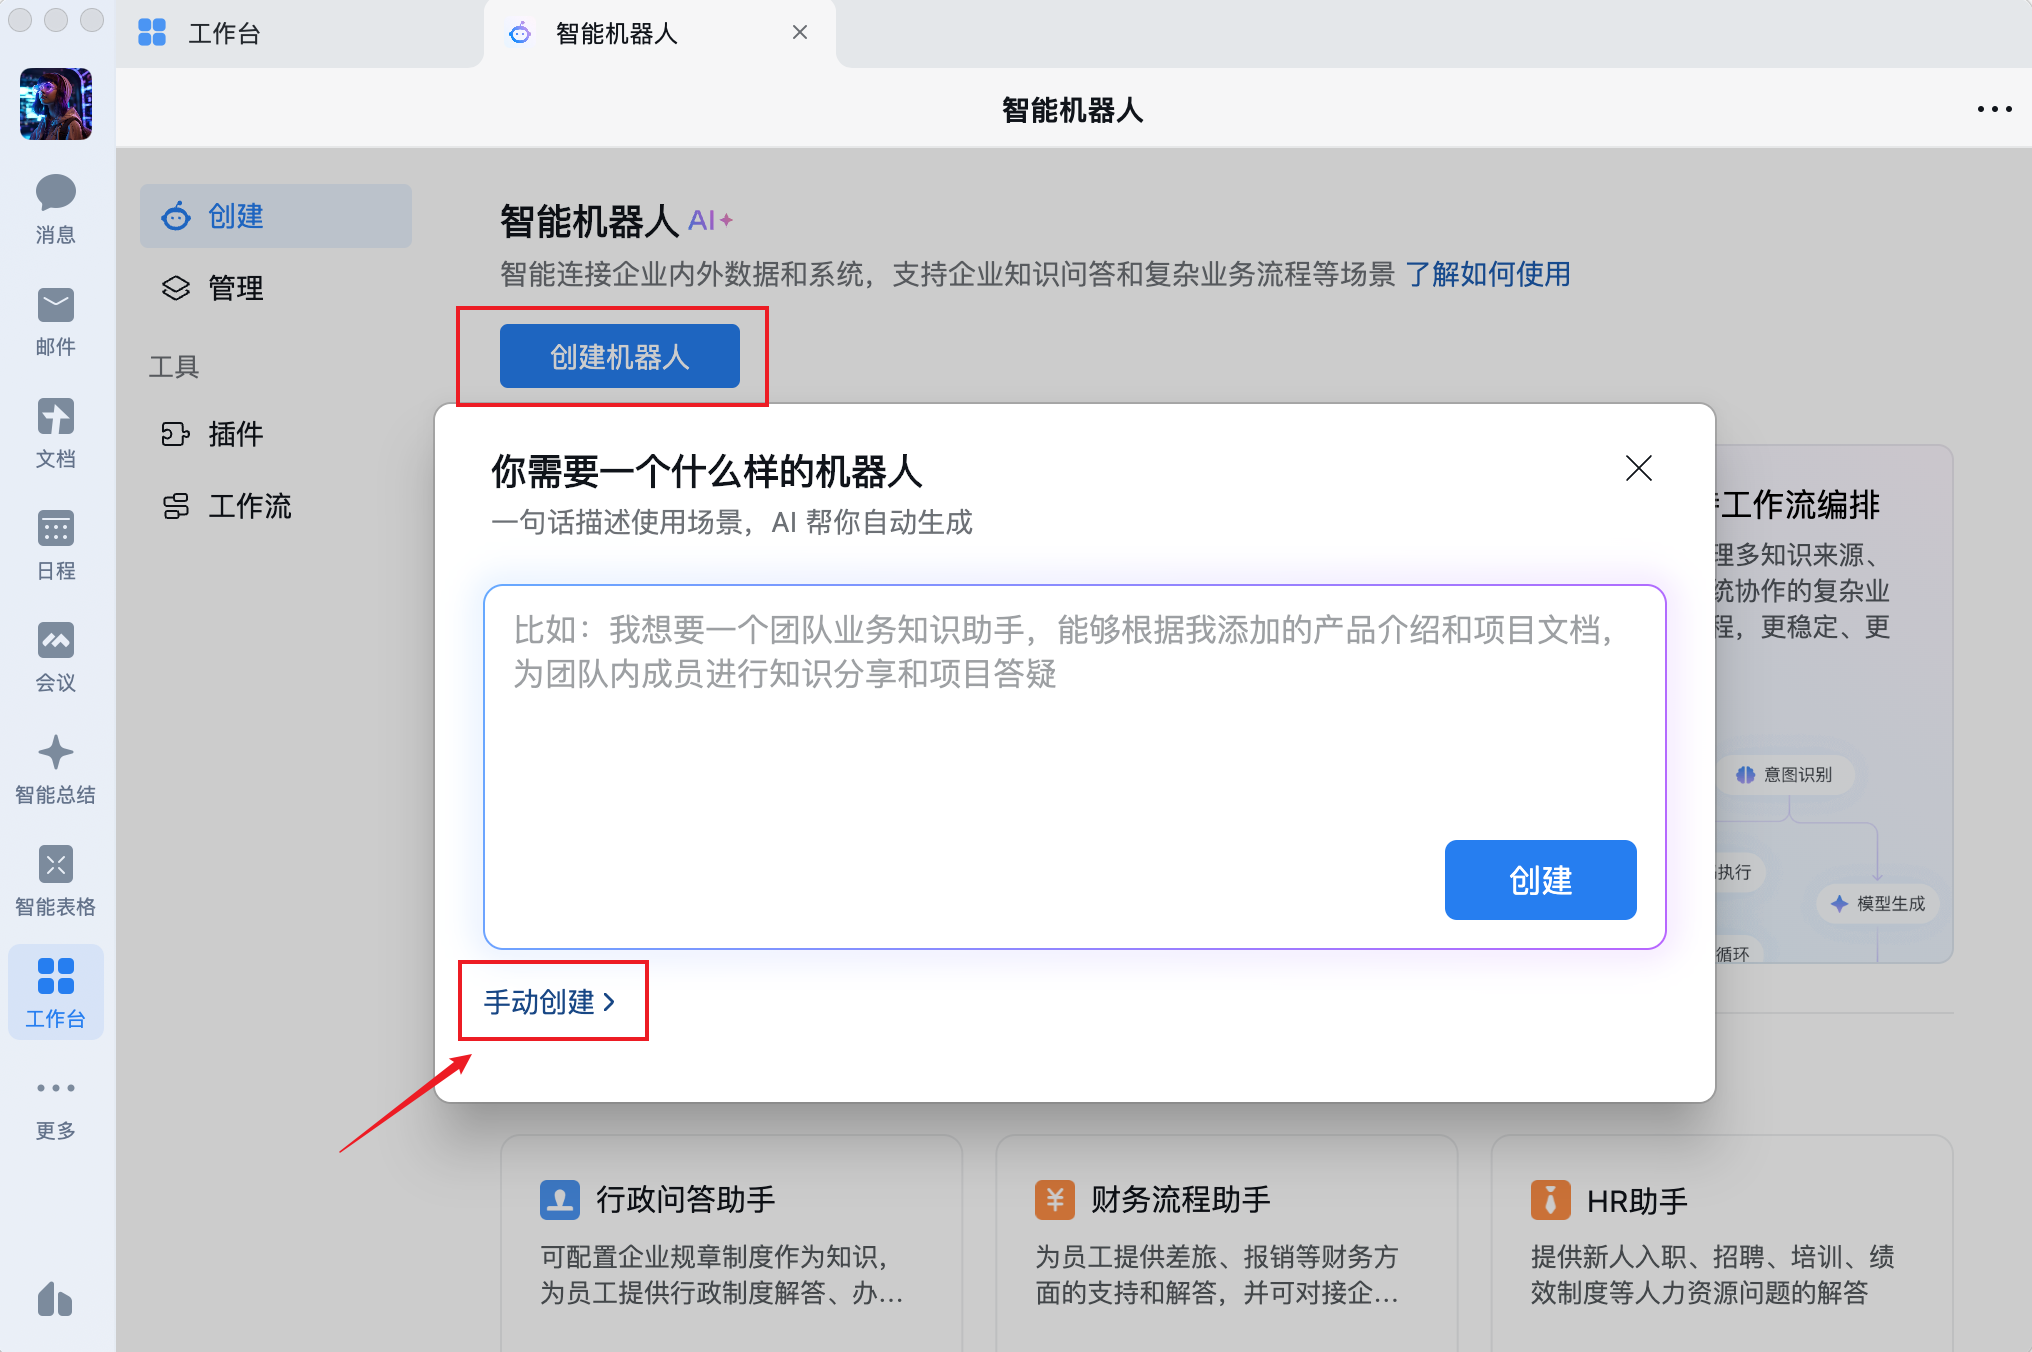
 2. Click **Create Bot → Manual Creation**:
 3. Scroll to the bottom of the right panel and select **API Mode**:
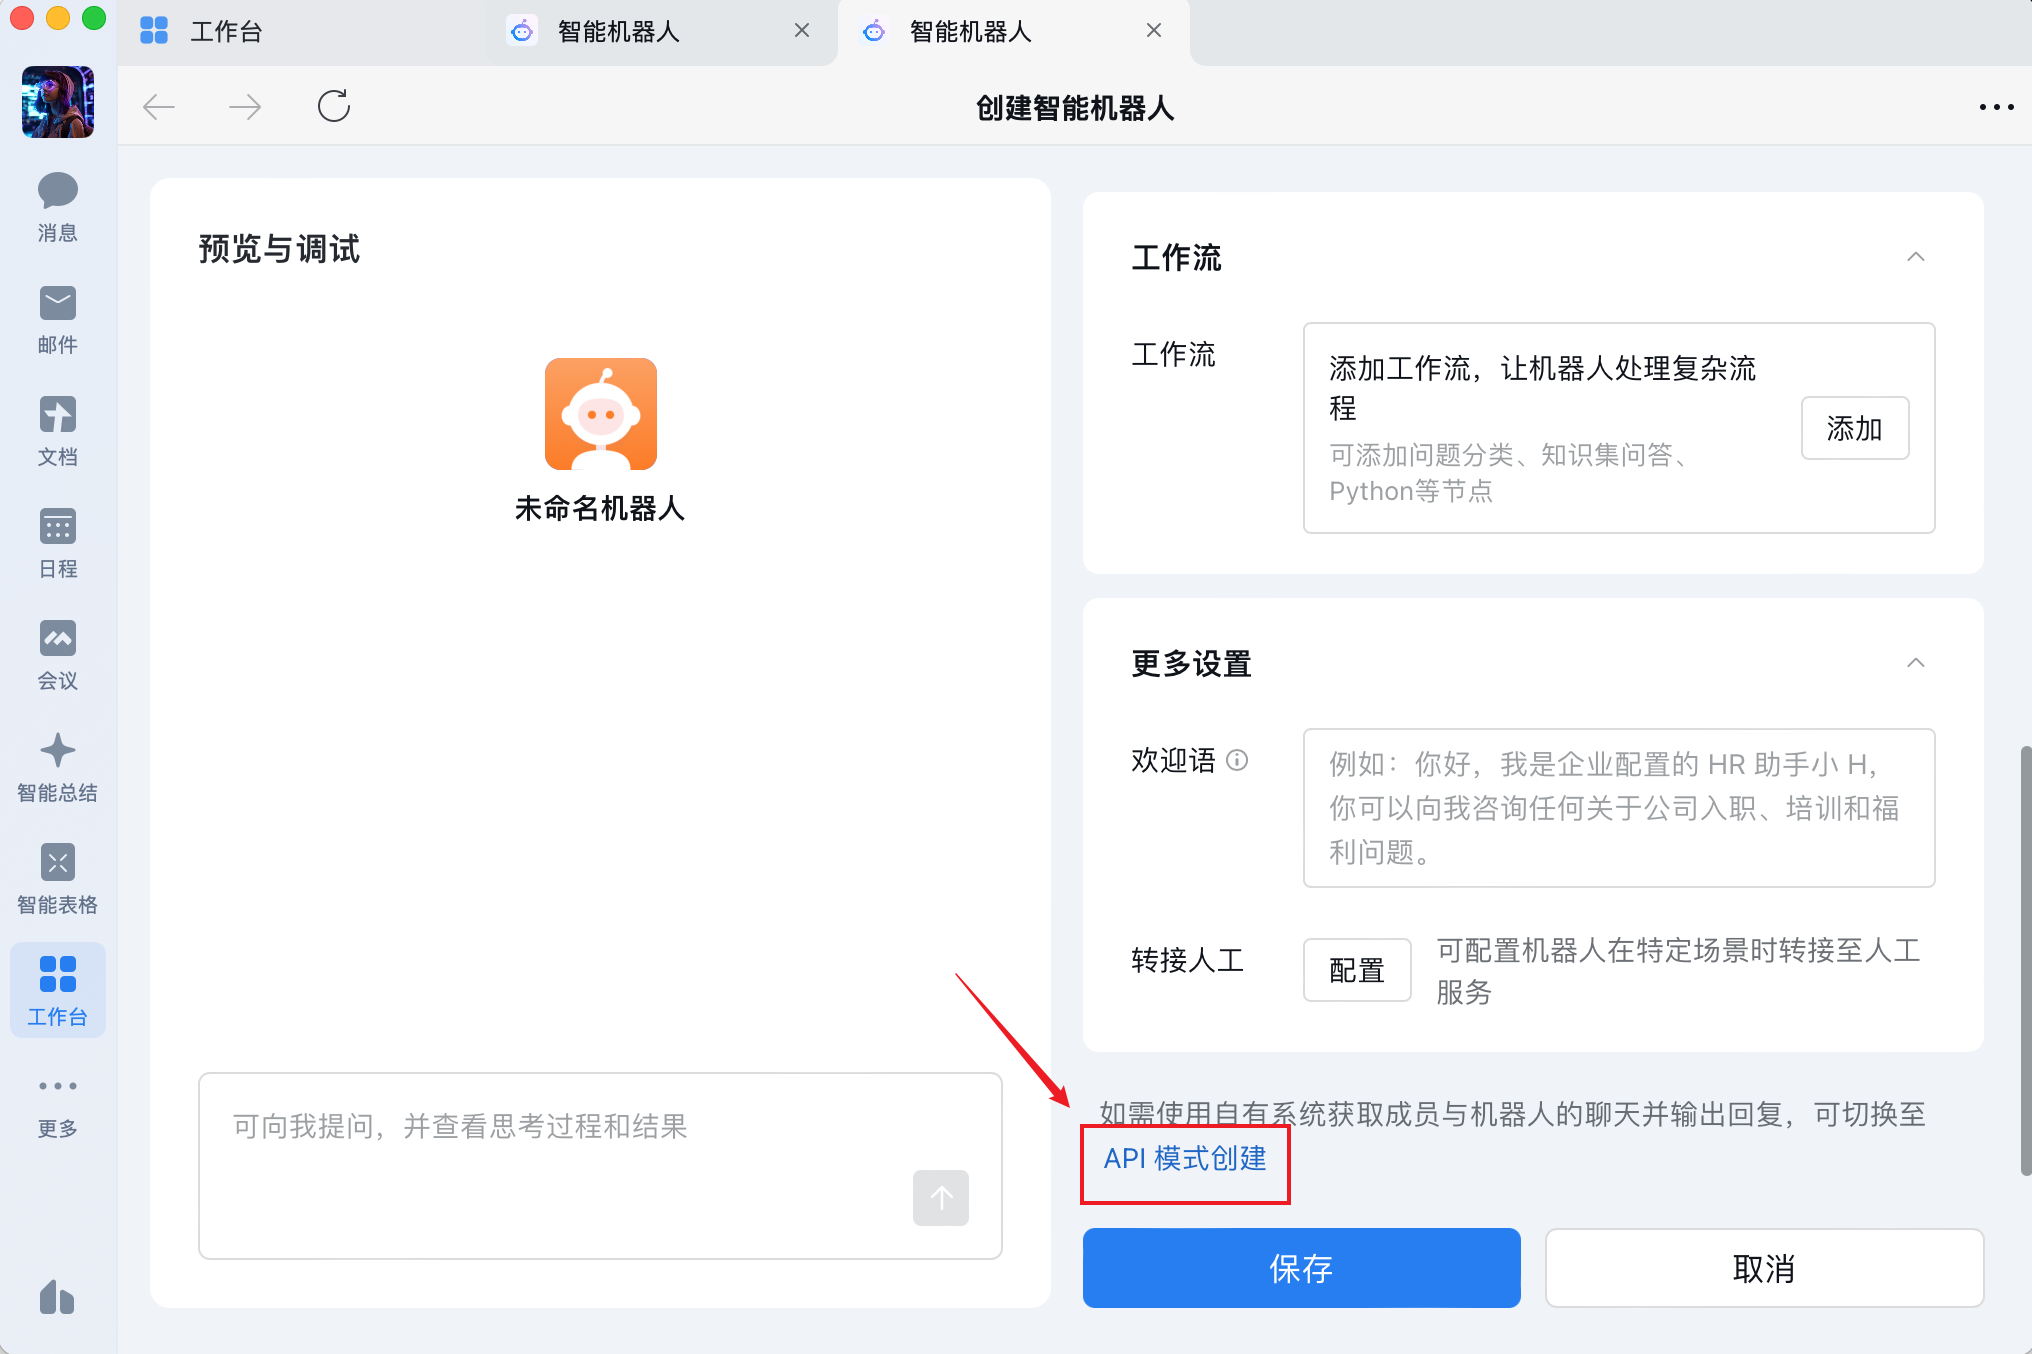 4. Set the bot name, avatar, and visibility scope. Choose **Long Connection** mode, save the **Bot ID** and **Secret**, then click Save.
**Step 2: Connect to CowAgent**
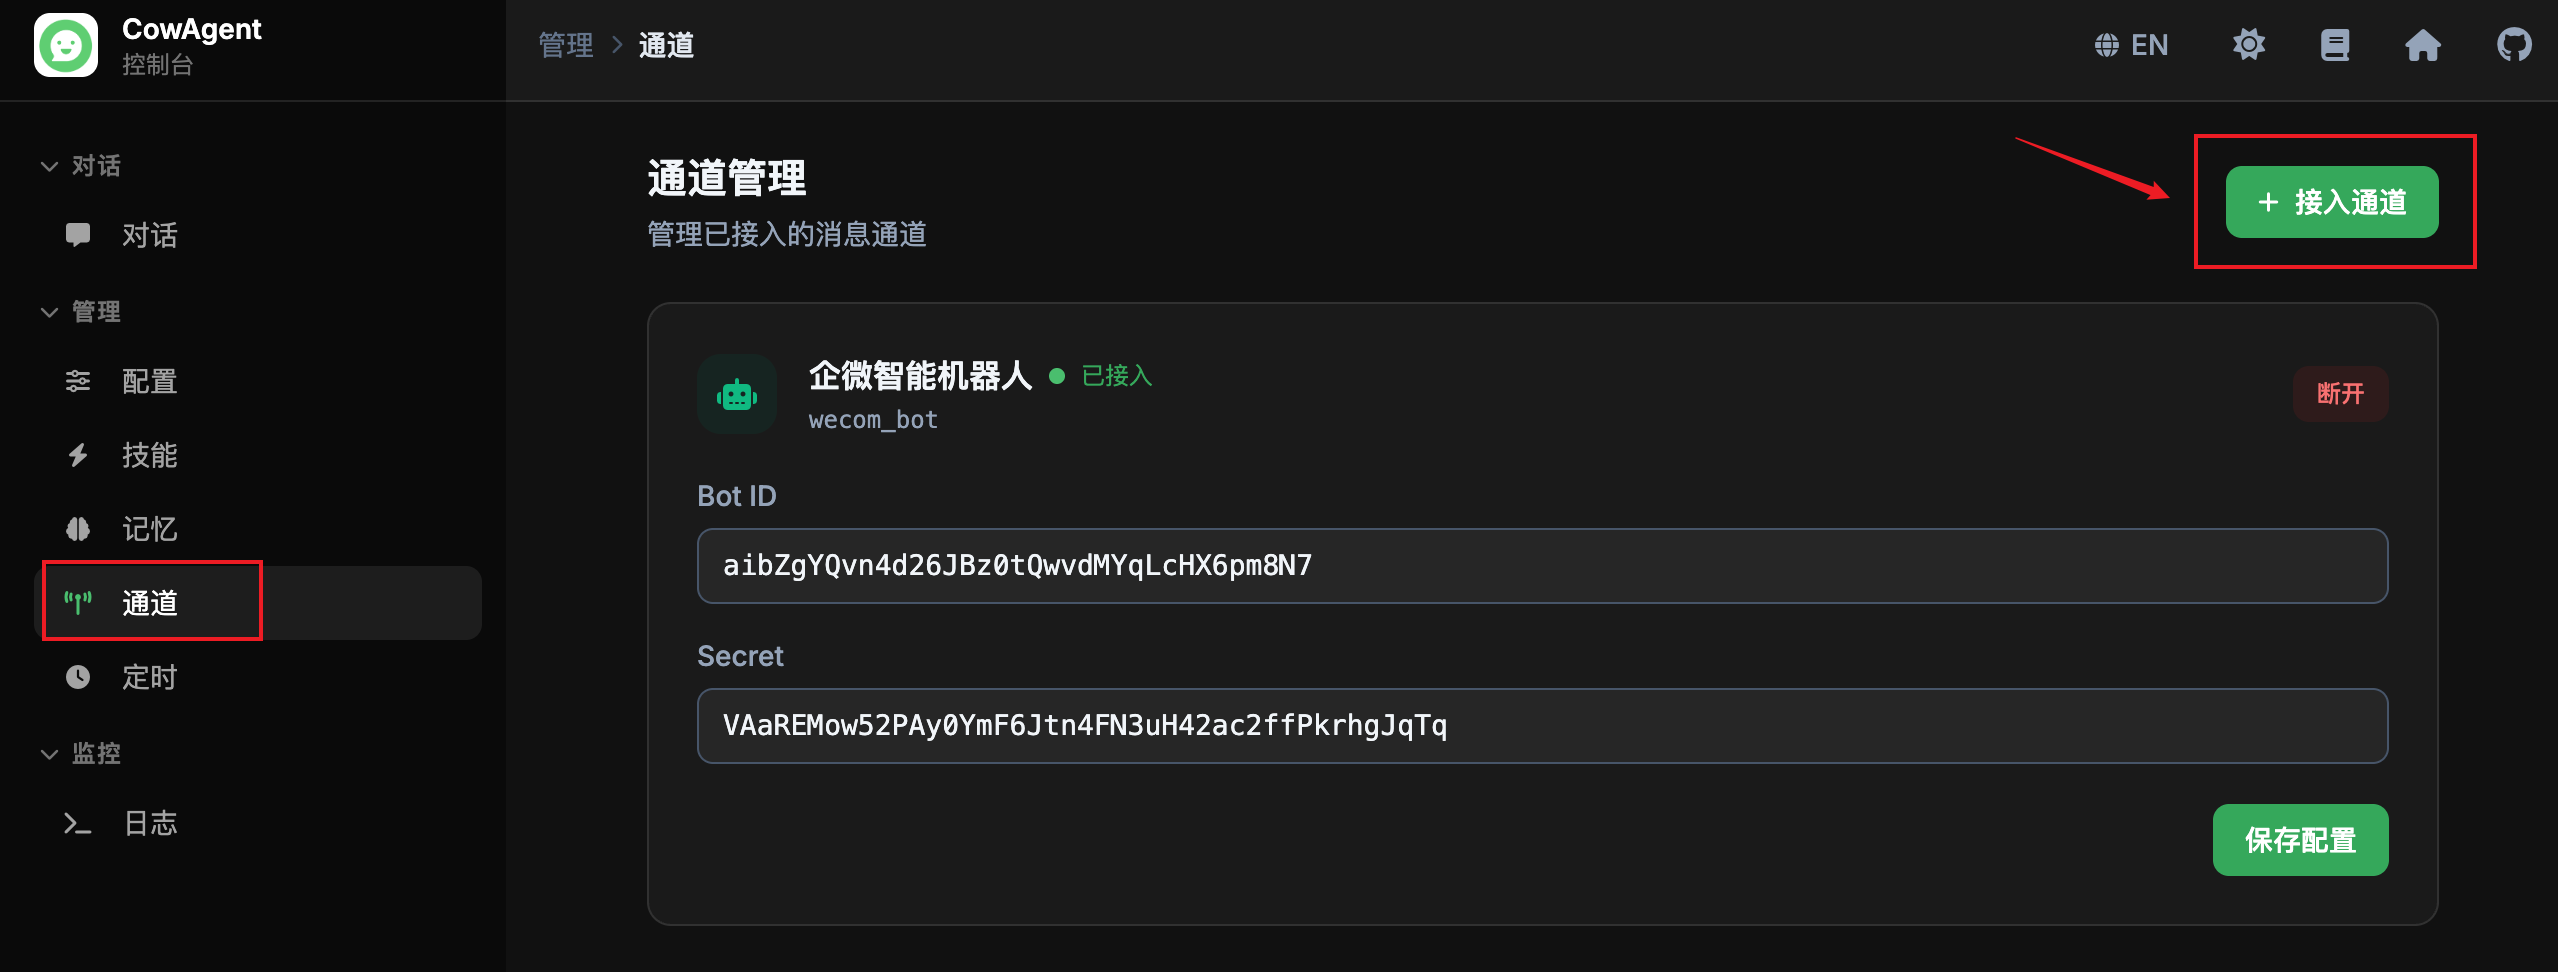
Open the Web console, go to the **Channels** tab, click **Connect Channel**, choose **WeCom Bot**, switch to **Manual** mode, enter the Bot ID and Secret, and click Connect.
4. Set the bot name, avatar, and visibility scope. Choose **Long Connection** mode, save the **Bot ID** and **Secret**, then click Save.
**Step 2: Connect to CowAgent**
Open the Web console, go to the **Channels** tab, click **Connect Channel**, choose **WeCom Bot**, switch to **Manual** mode, enter the Bot ID and Secret, and click Connect.
 Add the following to `config.json`, then start CowAgent:
```json theme={null}
{
"channel_type": "wecom_bot",
"wecom_bot_id": "YOUR_BOT_ID",
"wecom_bot_secret": "YOUR_SECRET"
}
```
| Parameter | Description |
| ------------------ | -------------------- |
| `wecom_bot_id` | Bot ID of the AI Bot |
| `wecom_bot_secret` | Secret of the AI Bot |
The log line `[WecomBot] Subscribe success` confirms the connection is established.
A **webhook (HTTP callback) mode** is also supported: when creating the bot, choose **Use URL callback**, set the receive-message URL to `http(s)://:9892/wecombot`, and copy the Token and EncodingAESKey from that page. This mode needs a publicly reachable address and does not support file sending or scheduled push, so the long connection is generally recommended. The corresponding `config.json`:
```json theme={null}
{
"channel_type": "wecom_bot",
"wecom_bot_mode": "webhook",
"wecom_bot_token": "YOUR_TOKEN",
"wecom_bot_encoding_aes_key": "YOUR_ENCODING_AES_KEY",
"wecom_bot_port": 9892
}
```
## 2. Supported features
| Feature | Status |
| ----------------------- | ---------------- |
| Direct chat | ✅ |
| Group chat (@bot) | ✅ |
| Text messages | ✅ Send / Receive |
| Image messages | ✅ Send / Receive |
| File messages | ✅ Send / Receive |
| Streaming replies | ✅ |
| Scheduled push messages | ✅ |
## 3. Usage
Search for the bot's name inside WeCom to start a direct chat.
To use the bot in an internal group chat, add it to the group and @-mention it.
Add the following to `config.json`, then start CowAgent:
```json theme={null}
{
"channel_type": "wecom_bot",
"wecom_bot_id": "YOUR_BOT_ID",
"wecom_bot_secret": "YOUR_SECRET"
}
```
| Parameter | Description |
| ------------------ | -------------------- |
| `wecom_bot_id` | Bot ID of the AI Bot |
| `wecom_bot_secret` | Secret of the AI Bot |
The log line `[WecomBot] Subscribe success` confirms the connection is established.
A **webhook (HTTP callback) mode** is also supported: when creating the bot, choose **Use URL callback**, set the receive-message URL to `http(s)://:9892/wecombot`, and copy the Token and EncodingAESKey from that page. This mode needs a publicly reachable address and does not support file sending or scheduled push, so the long connection is generally recommended. The corresponding `config.json`:
```json theme={null}
{
"channel_type": "wecom_bot",
"wecom_bot_mode": "webhook",
"wecom_bot_token": "YOUR_TOKEN",
"wecom_bot_encoding_aes_key": "YOUR_ENCODING_AES_KEY",
"wecom_bot_port": 9892
}
```
## 2. Supported features
| Feature | Status |
| ----------------------- | ---------------- |
| Direct chat | ✅ |
| Group chat (@bot) | ✅ |
| Text messages | ✅ Send / Receive |
| Image messages | ✅ Send / Receive |
| File messages | ✅ Send / Receive |
| Streaming replies | ✅ |
| Scheduled push messages | ✅ |
## 3. Usage
Search for the bot's name inside WeCom to start a direct chat.
To use the bot in an internal group chat, add it to the group and @-mention it.